How to Isolate Database Credentials in Spring Boot Using Vault
Data privacy and security became critical nowadays. Thus, we need to isolate database credentials and make it transparent to our applications/services.
Overview
In my old post, I wrote about encrypting database credentials using Jasypt. But we still keep encrypted values on properties file. Which means, at some point, developers can decrypt the value and read those credentials.
But..
How about making it truly transparent from application perspective? What I mean by transparent is; the application does not know anything about the credentials. Therefore, in this blog post, I would like to share about securing your database credentials from application point of view.
I will use Hashicorp Vault as a secret management tools. All database credentials will be stored inside Vault, and I will retrieve those credentials while bootstrapping the application.
Use Case
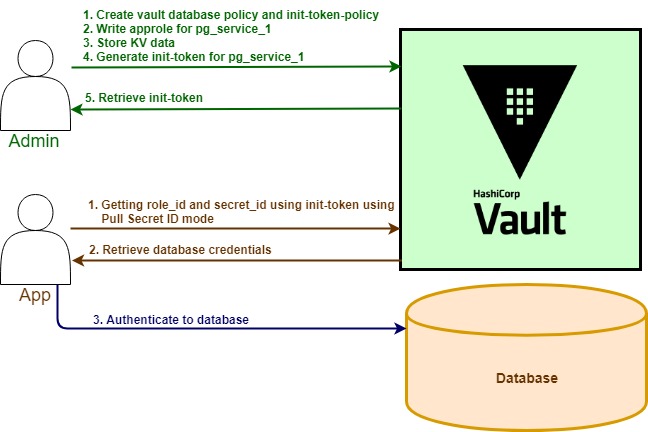
In this use case, I will create a service and I name it as pg_service_1. The service itself will connect to postgres database, just like any ordinary service. However, the difference is, I will not put any database credentials configuration inside properties file. Instead, they will be kept inside Vault.
pg_service_1 will pass the initial token with certain validity period to Vault. Next, by using AppRole authentication mode, the service will retrieve the database credentials during the application start up, using pull secret ID mode. Then the Dummy Service will connect to the database and continue ready to serve requests.
For this purpose, I will have two personas, which are admin and app (pg_service_1).
Admin
Step 1: Enable AppRole Authentication and Create Vault Policy
|
1 2 3 4 5 6 7 8 9 10 11 12 13 14 15 16 17 18 19 20 21 22 23 24 25 |
# enable approle vault auth enable approle # create secret path vault secrets enable -path=database kv-v2 # database-policy.hcl # Read-only permission on 'database/*' path tee database-policy.hcl <<"EOF" path "database/*" { capabilities = [ "read" ] } EOF vault policy write database database-policy.hcl # database-init-token.hcl # policy for initial token tee database-init-token.hcl <<"EOF" path "auth/approle/*" { capabilities = [ "create", "read", "update" ] } EOF vault policy write database-init-token database-init-token.hcl |
Step 2: Write AppRole for pg_service_1
|
1 2 |
# write approle for pg_service_1 with policy:database and ttl:1h vault write auth/approle/role/pg_service_1 policies="database" token_ttl=1h |
Step 3: Store KV Data
|
1 2 3 4 5 6 7 8 9 10 |
# Store kv data tee postgres.txt <<"EOF" { "url": "jdbc:postgresql://10.10.10.10:5432/db", "username": "user", "password": "password" } EOF vault kv put database/postgres/service_1 @postgres.txt |
Step 4: Generate Init Token and Pass It to App
|
1 2 3 4 |
# Generate init token for APP, valid for 3 days vault token create -policy=database-init-token -ttl=72h # Result: s.rMdwZh8udP9HVYmu1SmrSO3F |
App
For App, I will use Spring Boot as our pg_service_1.
Step 1: Add vault dependencies in pom.xml
|
1 2 3 4 5 6 7 8 9 |
<!-- snippet code --> <dependency> <groupId>org.springframework</groupId> <artifactId>spring-web</artifactId> </dependency> <dependency> <groupId>org.springframework.vault</groupId> <artifactId>spring-vault-core</artifactId> </dependency> |
Step 2: application.yml
|
1 2 3 4 5 6 7 8 9 10 11 12 13 14 15 16 17 18 19 20 |
spring: datasource: type: com.zaxxer.hikari.HikariDataSource driver-class-name: org.postgresql.Driver hikari: poolName: Hikari maximum-pool-size: 5 auto-commit: false connection-test-query: SELECT 1 jpa: database: POSTGRESQL hibernate: ddl-auto: update properties: hibernate.jdbc.lob.non_contextual_creation: true hibernate.connection.provider_disables_autocommit: true vault: appconfig: token: ${TOKEN:default} |
Please note I exclude url, username and password under spring.datasouce key.
Step 3: Configure Spring Vault
|
1 2 3 4 5 6 7 8 9 10 11 12 13 14 15 16 17 18 19 20 21 22 23 24 25 26 27 28 29 30 31 32 33 34 35 |
@Configuration @ConfigurationProperties(prefix = "vault.appconfig") public class AppConfig extends AbstractVaultConfiguration { private String token; public String getToken() { return this.token; } public void setToken(final String token) { this.token = token; } @Override public ClientAuthentication clientAuthentication() { final VaultToken initialToken = VaultToken.of(token); final AppRoleAuthenticationOptions options = AppRoleAuthenticationOptions .builder() .appRole("pg_service_1") .roleId(RoleId.pull(initialToken)) .secretId(SecretId.pull(initialToken)) .build(); return new AppRoleAuthentication(options, this.restOperations()); } @Override public VaultEndpoint vaultEndpoint() { final VaultEndpoint vaultEndpoint = VaultEndpoint.create("localhost", 8200); vaultEndpoint.setScheme("http"); return vaultEndpoint; } } |
AppRole authentication with PULL mechanism.
Step 4: Reconfigure Datasource Configuration
|
1 2 3 4 5 6 7 8 9 10 11 12 13 14 15 16 17 18 19 20 21 22 23 24 25 |
@Primary @Configuration @ConfigurationProperties(prefix = "spring.datasource") public class DataSourceConfig extends DataSourceProperties { @Autowired private AppConfig appConfig; @Override public void afterPropertiesSet() throws Exception { final VaultToken login = this.appConfig.clientAuthentication().login(); final VaultTemplate vaultTemplate = new VaultTemplate(this.appConfig.vaultEndpoint(), new TokenAuthentication(login.getToken())); final VaultKeyValueOperations operations = vaultTemplate.opsForKeyValue("database", KeyValueBackend.versioned()); final Map<String, Object> data = operations.get("postgres/service_1").getData(); this.setUsername((String) data.get("username")); this.setUrl((String) data.get("url")); this.setPassword((String) data.get("password")); super.afterPropertiesSet(); } } |
Note: set as @Primary bean, extends DataSourceProperties class and override afterPropertiesSet method.
Step 5: Start Application Using Init Token from Admin-Step 4
|
1 2 3 |
# pass init-token using -DTOKEN # init-token: s.rMdwZh8udP9HVYmu1SmrSO3F mvn spring-boot:run -DTOKEN=s.rMdwZh8udP9HVYmu1SmrSO3F |
The service should be up and running; with connection to postgres database.
Conclusion
By using this kind of database credentials isolation, we can make sure only certain people who have access to the credentials. This approach will make your IT ecosystem more secure, audit-able and controllable related user access to production database.
That’s all for now, and source code is in my github repository.
could you please send me the full source code or Git Hub directory..it will be very helpful for me Thanks in Advanced!
it is already there in the article. in the last paragraph, there is a link to my github repo.
Sangat bermanfaat sekali, saya dapat belajar banyak dari blog nya Pak Riki ini
How would application’s hikari pool refresh vault token expiries, if you can provide examples of how to handle token expiries for long running services and vault tokens with limited validity that would be great.
You need to restart your service. But maybe it is not an ideal condition. To mitigate this, you can use containers and do some blue-green deployment strategy to replace existing service and replace with the new token.
@Shayam
I’ve written two blog posts about how to ensure that expiring Spring Boot Vault database credentials are renewed, when reaching Vault’s max_ttl:
* https://secrets-as-a-service.com/posts/hashicorp-vault/spring-boot-max_ttl/
* https://secrets-as-a-service.com/posts/hashicorp-vault/rotate-dynamic-relational-database-connection-in-spring-at-runtime/
The second one is exatly handeling the case with a relational database and hikari pool. I hope this helps.
TL;DR:
General Options:
1. Use a long enough max_ttl and redeploy/restart the application often enough
2. If needed, increase the Vault system max time-to-live
3. Restart the Spring Boot application when the database secret expires
4. Implement database connection rotation (The second post is explaining exactly that.)
Relational Databases with hikari pool summery:
Add a LeaseListenener via addLeaseListener() which
* calls requestRotatingSecret() on the SecretLeaseContainer when the dynamic database lease expires
* reacts on a SecretLeaseCreatedEvent with mode ROTATE) by:
** setting username and password on the HikariConfigMXBean of the HikariDataSource
** call softEvictConnections() on the HikariPoolMXBean to use the new credentials