How to Secure Ansible Playbook Credentials using Hashicorp Vault
Isolate any target host’s credentials (hostname, user, password) from Ansible Playbook. And let the playbook retrieve those information from secret management tools (Hashicorp Vault) during targets provisioning.
Overview
When you are using Ansible, there must be a moment which you have stored credentials in your playbook. For that cases, usually we use Ansible Vault to encrypt the credential’s values. It is a very good Ansible feature, so we can keep the values inside a variable file.
However, sometimes it is not enough. Especially in the enterprise, where you have different team between infra, who do provisioning and security team, for managing credentials. For this case, one of the tools out there is Hashicorp Vault
Hashicorp Vault
Hashicorp Vault is a tools for managing secrets and protect sensitive data. You can access the data by using CLI, UI and REST API.
Please note that this article does not discuss how to use Hashicorp Vault in details. I assume you have already had basic knowledge about Hashicorp Vault.
For more information, please visit https://www.vaultproject.io.
Use Case
For this article, I want to simulate creating linux users, with username vault, in two remote machines using Ansible. The challenge is I do not have any credentials information about the remote machines. All the information is stored inside Hashicorp Vault. Ansible will connect to Vault by using TLS authentication mode, and retrieve access token via REST API.
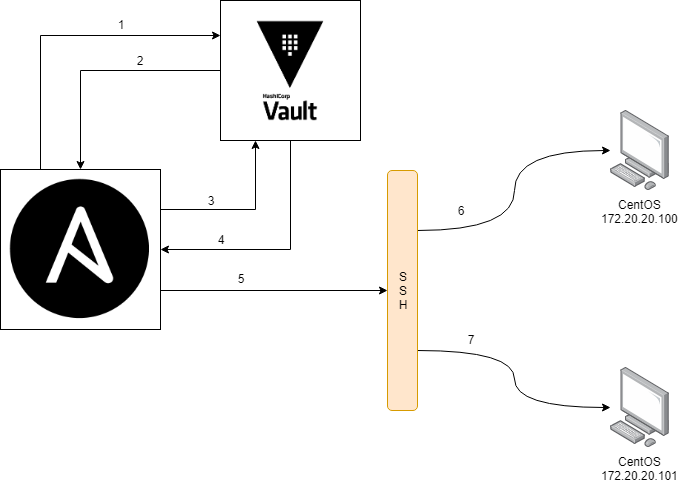
- Ansible asks for an access token to Vault
- Vault returns the access token
- Ansible asks machine credentials to Vault by using access token
- Vault return the stored credentials
- Ansible uses the credentials to provision the server via SSH
- Server 1 is provisioned
- Server 2 is provisioned
Assumptions:
- Vault is already up and running on address https://127.0.0.1:8200.
- The remote machines alias inside inventory file are host1 and host2.
Secret Engine and Policy
The secret engine location is under ansible/host1 and ansible/host2.
Please beware that the secret engine location is mapped with the remote machine alias in inventory files.
First, enable the ansible secret engine and populate values inside the engine.
|
1 2 3 4 |
# shell vault secrets enable -path=ansible kv-v2 vault kv put ansible/host1 host=172.20.20.100 username=vagrant password=vagrant vault kv put ansible/host2 host=172.20.20.101 username=vagrant password=vagrant |
Next create policy for ansible, put it in a file with name ansible.hcl
|
1 2 3 4 |
# file: ansible.hcl path "ansible/*" { capabilities = [ "read", "list" ] } |
And stored it into Vault
|
1 2 |
# shell vault policy write ansible ansible.hcl |
Certificate
Because we are using TLS authentication method, at first we need to enable it first.
|
1 2 |
# shell vault auth enable cert |
Generate certificate using openssl command
|
1 2 3 |
# shell # fill all the required information, including Common Name openssl req -newkey rsa:2048 -new -nodes -x509 -days 3650 -keyout key.pem -out cert.pem |
Configure the certificate into Vault
|
1 2 3 4 5 6 |
# Shell vault write auth/cert/certs/ansible \ display_name=ansible \ policies=ansible \ certificate=@cert.pem \ ttl=3600 |
Then stored the certificate into your playbook or you can store anywhere on your machine.
Ansible Playbook
Two main focus in the ansible-playbook are:
site.yml
This file contains the logic how to get access token as well as credentials with the benefit of URI module. The execution is in the local machine. Once the credentials are retrieved, then they are stored into dictionary objects, which in this example are dict_host, dict_user and dict_pass.
Next continue to provision the remote servers.
|
1 2 3 4 5 6 7 8 9 10 11 12 13 14 15 16 17 18 19 20 21 22 23 24 25 26 27 28 29 30 31 32 33 34 35 36 37 38 39 40 41 42 43 44 45 46 47 48 49 50 51 52 53 54 55 56 57 58 |
- hosts: localhost connection: local gather_facts: no vars: dict_host: {} dict_user: {} dict_pass: {} tasks: - name: show all the hosts matching the pattern debug: msg: "{{ item }}" with_inventory_hostnames: - all - name: get username and password from vault uri: url: https://127.0.0.1:8200/v1/auth/cert/login body: '{"name":"ansible"}' method: POST body_format: json validate_certs: no client_cert: 'cert/cert.pem' client_key: 'cert/key.pem' register: result - set_fact: client_token: "{{ result.json['auth'].client_token }}" - name: print token debug: msg: "{{ client_token }}" - name: get the secret! uri: url: "https://127.0.0.1:8200/v1/ansible/data/{{ item }}" method: GET validate_certs: no headers: X-Vault-Token: "{{ client_token }}" register: secret_result with_inventory_hostnames: - all - set_fact: dict_host: "{{ dict_host | combine( { item.item : item.json['data']['data'].host } ) }}" dict_user: "{{ dict_user | combine( { item.item : item.json['data']['data'].username } ) }}" dict_pass: "{{ dict_pass | combine( { item.item : item.json['data']['data'].password } ) }}" with_items: - "{{ secret_result.results }}" - hosts: servers gather_facts: no roles: - user_management become: true |
inventory
In the inventory file, put the alias similar with key inside secret engine, which are host1 and host2. Then retrieve the ansible_host, ansible_user and ansible_password by accessing the dictionary objects.
|
1 2 3 |
[servers] host1 ansible_host="{{ hostvars['localhost'].dict_host['host1'] }}" ansible_user="{{ hostvars['localhost'].dict_user['host1'] }}" ansible_password="{{ hostvars['localhost'].dict_pass['host1'] }}" host2 ansible_host="{{ hostvars['localhost'].dict_host['host2'] }}" ansible_user="{{ hostvars['localhost'].dict_user['host2'] }}" ansible_password="{{ hostvars['localhost'].dict_pass['host2'] }}" |
Run It!
Now run the playbook!
|
1 2 3 4 5 6 |
# start up the machine # Please enable the PasswordAuthentication in the /etc/sshd/sshd_config vagrant up # execute the playbook ansible-playbook -i inventory site.yml |
Once it finished, it would create a user with username vault inside each server.
Conclusion
In this example, the access token is only valid for 1 hour (because it is default ttl value in my Vault configuration). You can change the ttl value, let say only 15 minutes. Because most of provisioning should be done in a short time. Therefore, we set the token into the short-lived one then will be invalid after 15 minutes. Or, you can set the access token can only be valid after several requests to Vault. Everything depends on your needs.
Also, I only write about retrieving Linux credentials. But it is not limited for that sole purpose. Another case, for instance you need to provision a database server and you need to retrieve the database username and password in order to make first installation (I’m thinking about SYS user for Oracle). Of course you can store those information into Vault as well. And many more.
Lastly, you can check the source code in my github. Have a nice day/night!