Micro-services Using Go-kit: REST Endpoint
In this article, I will create a simple micro-service using Go programming language and go-kit as a standard micro-services library. The service will be exposed via REST endpoint.
Micro-services
In the today’s world, the micro-services architecture has gain its popularity. I will not explain what is micro-services architecture in particular, since there are lots of sites on the internet already discussed about this. However, I will give two good websites regarding micro-service.
Firstly from one of my favorite, Martin Fowler. You can see his amazing explanation here. And the other one is from microservices.io. There are many good articles inside talking about pattern and examples.
Go-lang
 Go is an open source programming language that makes it easy to build simple, reliable, and efficient software¹.
The language is designed by Google and intended to solve Google’s problems. So one can hope that this language work on a scale, for large programs and dependencies.
Go-kit

Go-kit really helps for simplifying in terms of building micro-services architecture. This is because it has so many features, such as service connectivity, metrics and logging. Therefore I would like to say a special thanks for Peter Bourgon (@peterbourgon) and all the contributors for providing this awesome libraries.
Use Case
My focus in this article is exposing REST endpoint as a service. The service itself will expose the endpoint with HTTP POST method. And then it will return lorem ipsum message within JSON format.
The endpoint URL format will be /lorem/{type}/{min}/{max}, with several descriptions:
typewill be a lorem type, which areword, sentence and paragraph.minandmaxwill be at least minimum letters and at most maximum letters for generator.
Note: I assume your GOPATH already set in the environment variables
Step-by-step
Before starting the step-by-step, there are several libraries which are needed for this examples. Those are:
- go-kit libraries.
- golorem libraries: for generating lorem ipsum text
- gorilla mux libraries: for http handler
|
1 2 3 |
go get github.com/go-kit/kit go get github.com/drhodes/golorem go get github.com/gorilla/mux |
Step 1: Building the Service
For whatever coolest tools you have, you need to create business logic at a first time. Our business logic is, as stated in the use case, to create lorem ipsum text, based on word, sentence or paragraph. So let’s create lorem folder under your workspace. In my case, my folder is $GOPATH/github.com/ru-rocker/gokit-playground/lorem. Then create file service.go under the folder and add the following code:
|
1 2 3 4 5 6 7 8 9 10 11 12 13 14 15 16 |
// Define service interface type Service interface { // generate a word with at least min letters and at most max letters. Word(min, max int) string // generate a sentence with at least min words and at most max words. Sentence(min, max int) string // generate a paragraph with at least min sentences and at most max sentences. Paragraph(min, max int) string } // Implement service with empty struct type LoremService struct { } |
Now we have already the interface. However, interface means nothing without methods implementation. To service.go, add following implementations:
|
1 2 3 4 5 6 7 8 9 10 11 12 |
// Implement service functions func (LoremService) Word(min, max int) string { return golorem.Word(min, max) } func (LoremService) Sentence(min, max int) string { return golorem.Sentence(min, max) } func (LoremService) Paragraph(min, max int) string { return golorem.Paragraph(min, max) } |
Notice that I am using golorem functions for each method implementations.
Step 2: Modeling Request and Response
Because this service is part of HTTP, therefore the next step is modeling request and response. If you look back to the Use Case, you will find there are three properties required for the implementation. Those are type, min and max.
And for the response itself, we only need two fields. Those fields are message that contains lorem ipsum text. The other one is error field, which will give error description whenever there is an error. So, let’s create another file, and give it a name endpoints.go and add the following code:
|
1 2 3 4 5 6 7 8 9 10 11 12 |
//request type LoremRequest struct { RequestType string Min int Max int } //response type LoremResponse struct { Message string `json:"message"` Err error `json:"err,omitempty"` //omitempty means, if the value is nil then this field won't be displayed } |
Step 3: Creating Endpoints
Endpoint is a special function in go-kit because you can wrap it into http.Handler. In order to make our service function turns into endpoint.Endpoint function, we are going to make a function to handle the LoremRequest, do some logic inside, then return the LoremResponse. To endpoints.go, add following code:
|
1 2 3 4 5 6 7 8 9 10 11 12 13 14 15 16 17 18 19 20 21 22 23 24 25 26 27 28 29 30 31 32 33 34 35 36 |
var ( ErrRequestTypeNotFound = errors.New("Request type only valid for word, sentence and paragraph") ) // endpoints wrapper type Endpoints struct { LoremEndpoint endpoint.Endpoint } // creating Lorem Ipsum Endpoint func MakeLoremEndpoint(svc Service) endpoint.Endpoint { return func(ctx context.Context, request interface{}) (interface{}, error) { req := request.(LoremRequest) var ( txt string min, max int ) min = req.Min max = req.Max if strings.EqualFold(req.RequestType, "Word") { txt = svc.Word(min, max) } else if strings.EqualFold(req.RequestType, "Sentence"){ txt = svc.Sentence(min, max) } else if strings.EqualFold(req.RequestType, "Paragraph") { txt = svc.Paragraph(min, max) } else { return nil, ErrRequestTypeNotFound } return LoremResponse{Message: txt}, nil } } |
Step 4: Transport
Before handling the http request and response, at first we need to create encoder and decoder from struct to json or the other way around. For this purpose, create new file, give it a name transport.go and add following code:
|
1 2 3 4 5 6 7 8 9 10 11 12 13 14 15 16 17 18 19 20 21 22 23 24 25 26 27 28 29 30 31 32 33 34 35 36 37 38 39 40 41 42 43 44 45 46 47 48 49 50 51 52 53 54 55 56 57 58 |
// decode url path variables into request func decodeLoremRequest(_ context.Context, r *http.Request) (interface{}, error) { vars := mux.Vars(r) requestType, ok := vars["type"] if !ok { return nil, ErrBadRouting } vmin, ok := vars["min"] if !ok { return nil, ErrBadRouting } vmax, ok := vars["max"] if !ok { return nil, ErrBadRouting } min, _ := strconv.Atoi(vmin) max, _ := strconv.Atoi(vmax) return LoremRequest{ RequestType: requestType, Min: min, Max: max, }, nil } // errorer is implemented by all concrete response types that may contain // errors. It allows us to change the HTTP response code without needing to // trigger an endpoint (transport-level) error. type errorer interface { error() error } // encodeResponse is the common method to encode all response types to the // client. func encodeResponse(ctx context.Context, w http.ResponseWriter, response interface{}) error { if e, ok := response.(errorer); ok && e.error() != nil { // Not a Go kit transport error, but a business-logic error. // Provide those as HTTP errors. encodeError(ctx, e.error(), w) return nil } w.Header().Set("Content-Type", "application/json; charset=utf-8") return json.NewEncoder(w).Encode(response) } // encode error func encodeError(_ context.Context, err error, w http.ResponseWriter) { if err == nil { panic("encodeError with nil error") } w.Header().Set("Content-Type", "application/json; charset=utf-8") w.WriteHeader(http.StatusInternalServerError) json.NewEncoder(w).Encode(map[string]interface{}{ "error": err.Error(), }) } |
Once you already declare the encoder and decoder functions, then it is time to create the http handler. To transport.go, add following code:
|
1 2 3 4 5 6 7 8 9 10 11 12 13 14 15 16 17 18 19 20 21 22 23 |
var ( // ErrBadRouting is returned when an expected path variable is missing. ErrBadRouting = errors.New("inconsistent mapping between route and handler (programmer error)") ) // Make Http Handler func MakeHttpHandler(ctx context.Context, endpoint Endpoints, logger log.Logger) http.Handler { r := mux.NewRouter() options := []httptransport.ServerOption{ httptransport.ServerErrorLogger(logger), httptransport.ServerErrorEncoder(encodeError), } //POST /lorem/{type}/{min}/{max} r.Methods("POST").Path("/lorem/{type}/{min}/{max}").Handler(httptransport.NewServer( ctx, endpoint.LoremEndpoint, decodeLoremRequest, encodeResponse, options..., )) return r } |
Note: take a look at line 15. It is the way to describe the URL path and HTTP request method.
Step 5: Main
So far we already have service/business layer, endpoint and transport for our services. After all set, it is time to create the main function. The main function basically structure the endpoint and make it available into HTTP transport.
So, under the lorem folder, create another folder, named it lorem.d. The dot d means daemon. You can name it as you like it. I prefer this one. Then create file main.go, and add following code:
|
1 2 3 4 5 6 7 8 9 10 11 12 13 14 15 16 17 18 19 20 21 22 23 24 25 26 27 28 29 30 31 32 33 34 35 |
func main() { ctx := context.Background() errChan := make(chan error) var svc lorem.Service svc = lorem.LoremService{} endpoint := lorem.Endpoints{ LoremEndpoint: lorem.MakeLoremEndpoint(svc), } // Logging domain. var logger log.Logger { logger = log.NewLogfmtLogger(os.Stderr) logger = log.NewContext(logger).With("ts", log.DefaultTimestampUTC) logger = log.NewContext(logger).With("caller", log.DefaultCaller) } r := lorem.MakeHttpHandler(ctx, endpoint, logger) // HTTP transport go func() { fmt.Println("Starting server at port 8080") handler := r errChan <- http.ListenAndServe(":8080", handler) }() go func() { c := make(chan os.Signal, 1) signal.Notify(c, syscall.SIGINT, syscall.SIGTERM) errChan <- fmt.Errorf("%s", <-c) }() fmt.Println(<- errChan) } |
Step 6: Run the Example
It is time to run the example. Open your shell and type:
|
1 2 |
cd $GOPATH go run src/github.com/ru-rocker/gokit-playground/lorem/lorem.d/main.go |
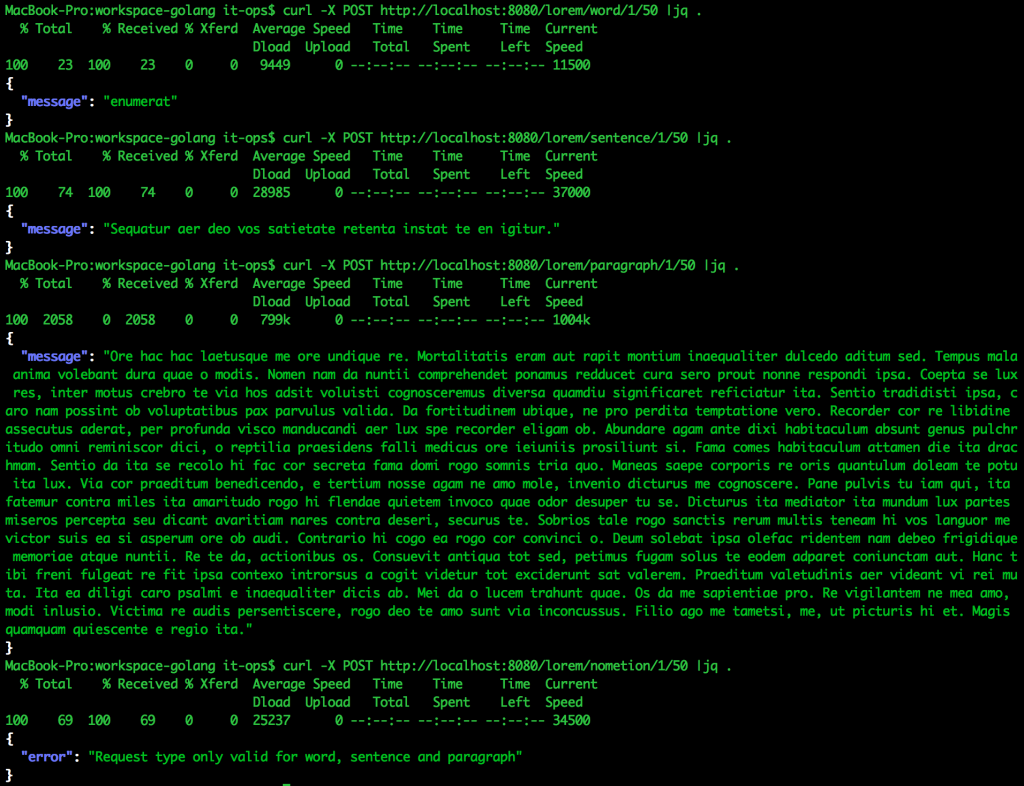
Test the endpoint by using curl or postman. And you will see similar results:
Sample Code
That’s it. Whenever you have any interest about this article and willing to know more, you can check on my github.
See ya.