How to Create Custom Ansible Wildfly Module – Part 3
Introduction
Welcome to Ansible Wildfly Module part 3. Well, after creating a server, it is time to configure the JVM parameter. Basically, Wildfly host already has default JVM parameter. So, in practical, setting JVM is not a must, but sometimes it is needed.
Take note here, this how-to only works in domain mode as well.
Use Case
In this use case, I want to leverage Wildfly host with these specifications: JVM for a server with minimum heap size 512MB, maximum heap size 1024MB.
Well, maybe you have already noticed that there are permgen parameters, which in Java 8 are not needed anymore. But, currently the properties is there, so just add this parameters as a precaution. Maybe someone is using JDK 7.
And of course, if we can add JVM then we have to provide the remove functionality as well.
Cheat Sheet
This how-to is running on JDK 8, Wildfly 10, Python 2.7 and Ansible 2.1.2. Moreover, these are JBoss-CLI commands for JVM purpose.
|
1 2 3 4 5 6 7 8 9 10 11 12 13 14 15 16 17 18 19 20 |
# Add JVM /host=HOST_NAME/server-config=SERVER_NAME/jvm=JVM_NAME:add # Set minimum heap size /host=HOST_NAME/server-config=SERVER_NAME/jvm=JVM_NAME:write-attribute(name=heap-size,value=HEAP_SIZE) # Set maximum heap size /host=HOST_NAME/server-config=SERVER_NAME/jvm=JVM_NAME:write-attribute(name=max-heap-size,value=HEAP_SIZE) # Set minimum heap size /host=HOST_NAME/server-config=SERVER_NAME/jvm=JVM_NAME:write-attribute(name=permgen-size,value=HEAP_SIZE) # Set maximum heap size /host=HOST_NAME/server-config=SERVER_NAME/jvm=JVM_NAME:write-attribute(name=max-permgen-size,value=HEAP_SIZE) # Set additional JVM options /host=HOST_NAME/server-config=SERVER_NAME/jvm=JVM_NAME:add-jvm-option(jvm-option=JVM_OPTIONS # Remove JVM /host=HOST_NAME/server-config=SERVER_NAME/jvm=JVM_NAME:remove) |
Step by step
Step 1 – Create Python File
As usual, create a python file and name it jcli_jvm.py. Then put the file under library folder. Also do not forget to add hash bang and import statement.
|
1 2 3 4 |
#!/usr/bin/python from ansible.module_utils.basic import * import subprocess |
Step 2 – Create Function to Check JVM Existence
Just as all previous posts, before creating or removing JVM, we need to have a functionality in order to validate whether the JVM has already been created or not. Also, one of the reasons is to determine the Ansible changed flag as well.
|
1 2 3 4 5 6 7 8 9 10 11 12 13 14 15 16 17 18 19 20 21 22 23 24 25 |
def isJvmAlreadyCreated(data): cmd = data['jboss_home'] + '/bin/jboss-cli.sh' cli = "/host=%s/server-config=%s/jvm=%s:query" % (data['host'], data['server_config_name'], data['jvn_name']) controller = "--controller=%s:%s" % (data['controller_host'],data['controller_port']) user = "-u=%s" % (data['user']) password = "-p=%s" % (data['password']) p = subprocess.Popen(["sh", cmd, "-c", cli, controller, user, password], stdout=subprocess.PIPE) result = p.communicate()[0] created = False remoteExists = False result = str(result) if "WFLYCTL0216" in result: created = False else: created = True if "WFLYPRT0053" in result: remoteExists = False else: remoteExists = True return remoteExists, created |
Note: this similar with part 1 and part 2.
- We have six dictionary keys, which are
jboss_home,server_group_name,controller_host,controller_port,userandpassword. These keys will be defined in the main method. - Whenever the result contains
WFLYCTL0216, it is assumed that the JVM with the given name already created. - Whenever the result contains
WFLYPRT0053, it is assumed that the remote host cannot be reached.
Step 3 – Create Functions for JVM Maintenance
In this step, we need to create to functions. First is for creating JVM and setting the parameters, then attach to specific Wildfly Server. We will give it a name jvm_present. Secondly, the function to remove JVM from it and name it jvm_absent.
jvm_present
|
1 2 3 4 5 6 7 8 9 10 11 12 13 14 15 16 17 18 19 20 21 22 23 24 25 26 27 28 29 30 31 32 33 34 35 36 37 38 39 40 41 42 43 44 45 46 47 48 49 50 51 52 53 54 55 56 57 58 59 60 61 62 |
def jvm_present(data): cmd = data['jboss_home'] + '/bin/jboss-cli.sh' controller = "--controller=%s:%s" % (data['controller_host'],data['controller_port']) user = "-u=%s" % (data['user']) password = "-p=%s" % (data['password']) exists, created = isJvmAlreadyCreated(data) isError = False hasChanged = True meta = {} res =[] if not exists: mesg = "Could not connect http-remoting://%s:%s" % (data['controller_host'],data['controller_port']) meta = {"status": "Error", "response": mesg} isError = True hasChanged = False else: if not created: cli = "/host=%s/server-config=%s/jvm=%s:add" % (data['host'],data['server_config_name'],data['jvn_name']) p = subprocess.Popen(["sh", cmd, "-c", cli, controller, user, password], stdout=subprocess.PIPE) result,err = p.communicate() res.append(result) cli = "/host=%s/server-config=%s/jvm=%s:write-attribute(name=heap-size,value=%s)" % (data['host'],data['server_config_name'],data['jvn_name'],data['heap_size']) p = subprocess.Popen(["sh", cmd, "-c", cli, controller, user, password], stdout=subprocess.PIPE) result,err = p.communicate() res.append(result) cli = "/host=%s/server-config=%s/jvm=%s:write-attribute(name=max-heap-size,value=%s)" % (data['host'],data['server_config_name'],data['jvn_name'],data['max_heap_size']) p = subprocess.Popen(["sh", cmd, "-c", cli, controller, user, password], stdout=subprocess.PIPE) result,err = p.communicate() res.append(result) cli = "/host=%s/server-config=%s/jvm=%s:write-attribute(name=permgen-size,value=%s)" % (data['host'],data['server_config_name'],data['jvn_name'],data['permgen_size']) p = subprocess.Popen(["sh", cmd, "-c", cli, controller, user, password], stdout=subprocess.PIPE) result,err = p.communicate() res.append(result) cli = "/host=%s/server-config=%s/jvm=%s:write-attribute(name=max-permgen-size,value=%s)" % (data['host'],data['server_config_name'],data['jvn_name'],data['max_permgen_size']) p = subprocess.Popen(["sh", cmd, "-c", cli, controller, user, password], stdout=subprocess.PIPE) result,err = p.communicate() res.append(result) if data['jvm_options'] is not None: cli = "/host=%s/server-config=%s/jvm=%s:add-jvm-option(jvm-option=%s)" % (data['host'],data['server_config_name'],data['jvn_name'],data['jvm_options']) p = subprocess.Popen(["sh", cmd, "-c", cli, controller, user, password], stdout=subprocess.PIPE) result,err = p.communicate() res.append(result) cli = "reload --host=%s" % (data['host']) p = subprocess.Popen(["sh", cmd, "-c", cli, controller, user, password], stdout=subprocess.PIPE) result,err = p.communicate() res.append(result) meta = {"status": "OK", "response": res} else: hasChanged = False resp = "JVM %s already created" % (data['jvn_name']) meta = {"status" : "OK", "response" : resp} return isError, hasChanged, meta |
jvm_absent
|
1 2 3 4 5 6 7 8 9 10 11 12 13 14 15 16 17 18 19 20 21 22 23 24 25 26 27 28 |
def jvm_absent(data): cmd = data['jboss_home'] + '/bin/jboss-cli.sh' controller = "--controller=%s:%s" % (data['controller_host'],data['controller_port']) user = "-u=%s" % (data['user']) password = "-p=%s" % (data['password']) exists, created = isJvmAlreadyCreated(data) isError = False hasChanged = True meta = {} if not exists: mesg = "Could not connect http-remoting://%s:%s" % (data['controller_host'],data['controller_port']) meta = {"status": "Error", "response": mesg} isError = True hasChanged = False else: if not created: hasChanged = False resp = "JVM %s does not exist" % (data['jvn_name']) meta = {"status" : "OK", "response" : resp} else: cli = "/host=%s/server-config=%s/jvm=%s:remove" % (data['host'],data['server_config_name'],data['jvn_name']) p = subprocess.Popen(["sh", cmd, "-c", cli, controller, user, password], stdout=subprocess.PIPE) result,err = p.communicate() meta = {"status": "OK", "response": result} return isError, hasChanged, meta |
Note:
- There are 8 additional field keys, which are:
host,server_config_name,jvm_name,heap_size,max_heap_size,permgen_size,jvm_optionsandmax_permgen_size. - After setting the new JVM parameter, we need to reload the server in order to make it works.
Step 4 – Define Main Function
Now it is time to define main function. Collect all the dictionary keys and the state keys, then put them into main function. And define the main function as well.
|
1 2 3 4 5 6 7 8 9 10 11 12 13 14 15 16 17 18 19 20 21 22 23 24 25 26 27 28 29 30 31 32 33 34 35 36 37 38 39 40 41 42 43 44 45 46 47 48 49 50 51 52 53 54 55 56 57 58 59 60 61 62 63 64 65 66 67 68 69 70 71 72 73 74 75 76 77 78 |
def main(): fields = { "jboss_home" : {"required": True, "type": "str"}, "host": { "required": False, "default": "master", "type": "str" }, "controller_host": { "required": False, "default": "localhost", "type": "str" }, "controller_port": { "required": False, "default": 9990, "type": "int" }, "server_config_name": { "required": True, "type": "str" }, "jvn_name": { "required": True, "type": "str" }, "heap_size": { "required": True, "type": "str" }, "max_heap_size": { "required": True, "type": "str" }, "permgen_size": { "required": True, "type": "str" }, "max_permgen_size": { "required": True, "type": "str" }, "jvm_options": { "required": False, "type": "str" }, "user" : { "required": True, "type": "str" }, "password" : { "required": True, "type": "str" }, "state": { "default": "present", "choices": ['present', 'absent'], "type": 'str' }, } choice_map = { "present": jvm_present, "absent": jvm_absent, } module = AnsibleModule(argument_spec=fields) is_error, has_changed, result = choice_map.get( module.params['state'])(module.params) if not is_error: module.exit_json(changed=has_changed, meta=result) else: module.fail_json(msg="Error creating server", meta=result) if __name__ == '__main__': main() |
Step 5 – play.yml
It is time to add this module into your play.yml.
|
1 2 3 4 5 6 7 8 9 10 11 12 13 14 15 16 |
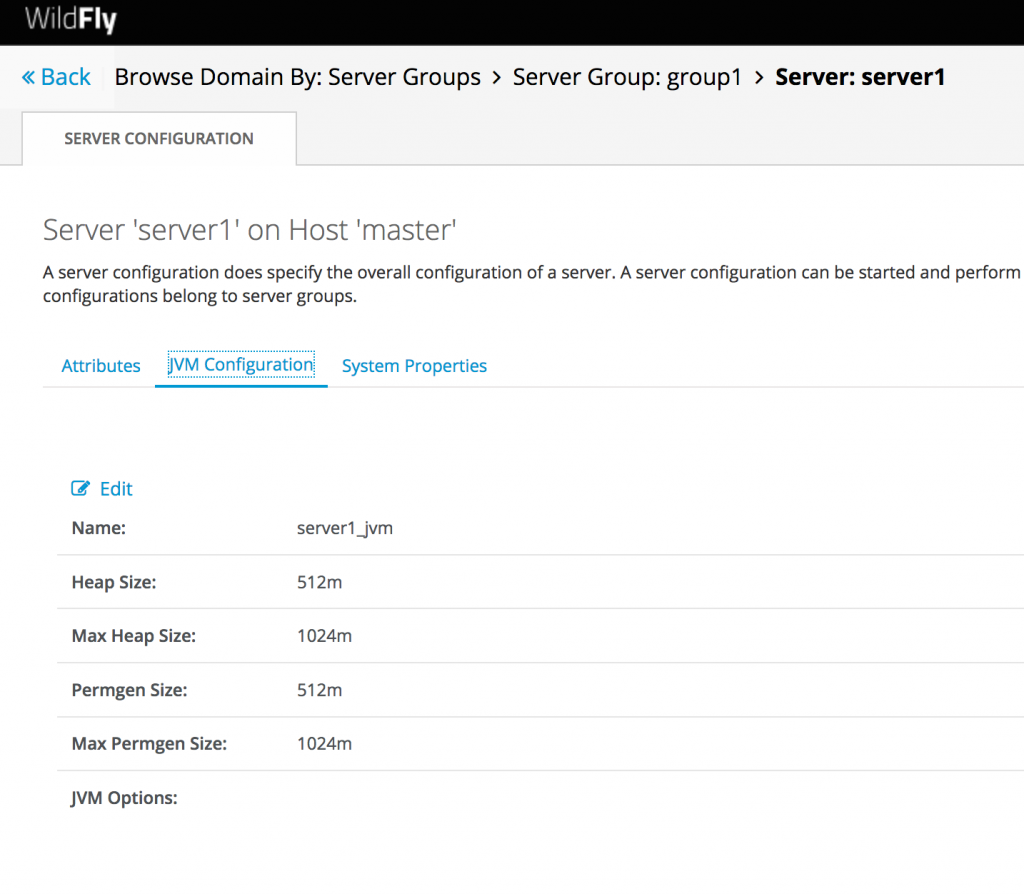
- name: JVM jcli_jvm: jboss_home: /Users/it-ops/Documents/java_dev/server/wildfly-10.0.0.Final/ host: master server_config_name: server1 jvn_name: server1_jvm heap_size: 512m max_heap_size: 1024m permgen_size: 512m max_permgen_size: 1024m state: present user: wildfly password: password register: hasil - debug: var=hasil |
Note: I snipped the playbook only for JVM part. If you want to see the whole parts, you can see in previous post.
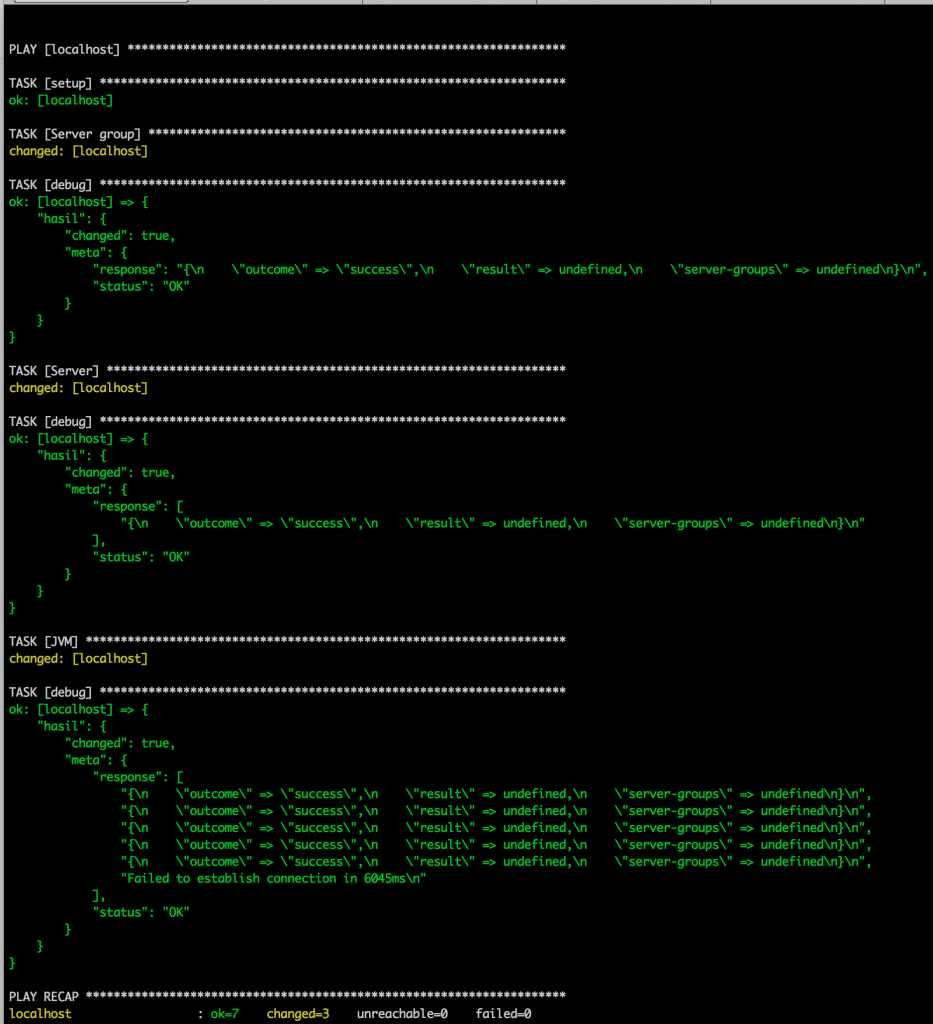
Execute the play.yml then you will see similar result:
Conclusion
Now we have successfully attach JVM with custom parameters into Wildfly Server. The next part is about deploying our WAR or EAR into the it. Have a blessed day!